Veg Dum Biryani
[DISPLAY_ULTIMATE_SOCIAL_ICONS]
When you think of biryani, the first thing that comes to mind is either Chicken or Mutton biryani. But we keep forgetting Vegetable biryani which I believe, is the most flavorful of the lot. The vegetables when spiced and slow-cooked with all the garam masalas have an unbelievable flavor and when that’s mixed with aromatic basmati rice, it is the best combination ever. This recipe here achieves that hyderabadi Veg dum biryani taste in a very easy and simplified way at home. This will seem very long but its more information about the process rather than the actual process. Once you get the hang of it, you will be making restaurant-grade Biryani yourself. Trust me and try it once!

So what is Biryani? Lets start there…
Biryani is a mixed rice dish made using any meat or vegetables and rice. It is believed to be originated from the royal kitchens of Mughal empire. But now, it is famous all over the world and enjoyed by many. Biryani is also prepared in lots of varieties and Hyderabad-style Dum biryani is the most popular one. Dum is a slow cooking method where meat/vegetables and rice are cooked together in a sealed container to infuse the spices. By cooking slowly in its own juices, the biryani attains the natural flavor of herbs and spices, simply put, lip-smackingly delicious!
Steps to achieve the perfect Veg Dum Biryani:
I believe, for a biryani, Process is more important than the ingredients. Biryani has 3 basic steps and if done right, you will get the best biryani ever.
- Step 1: Marination and preparing the base/gravy: Vegetables used for the veg biryani needs to marinate for at least for half hour, so the flavors get absorbed. Chicken biryani, on the other hand, needs longer marination which we are going to get to in a different post.
- First, we need to marinate the veggies. I use potatoes, green beans, peas and carrots. I recommend using sturdy vegetables that can hold their shape after cooking them. Mushy vegetables like peppers, cauliflower can be added but I would recommend adding them after these sturdy vegetables are done cooking, may be just before layering for dum. Paneer is also an awesome addition to veg biryani. Just fry it up a little in the pan and add later when you are about to “dum” the biryani.

- Add Salt, Turmeric, Red chilli powder, coriander powder, garam masala powder, ginger-garlic paste, mint-coriander paste, lemon juice, yogurt and mix well. Let it sit for at least half hour or overnight. I make my own ginger-garlic paste in bulk, find the recipe here: Ginger Garlic Paste – Blissful Bites by Tay

- I use my instant pot to cook my vegetables, you can use a pressure cooker or simply a pan and cook till the potatoes are done.
- Turn on Sauté mode and when the pot is hot, add ghee/Butter. Add whole garam masala spices and sauté for a minute till they start to sizzle and beautiful aroma of spices comes out. The spices I added here are cloves, cinnamon, shah jeera, cardamom, star anise.
- Add the marinated veggies, Sauté for a few minutes and close the lid. Pressure cook/Manual mode : 5 Minutes. DO NOT ADD ANY WATER. If you are using a pressure cooker, pressure cook for just one whistle.

- Step 2: Make Rice: Biryani rice needs to be super fluffy and should scatter like pearls. Mushy rice is just not allowed, period. I like using Royal Chef’s Secret Extra long grain Basmati rice to attain that pearl like texture. The aroma is so amazing, that you can eat the rice as is.
- Wash and soak the rice for at least an hour.
- First boil a pot of water, add salt, 2 tbsp butter, cardamom and a bay leaf. There is no measure for water. Just a large pot more than half way filled. The water should be salty like sea water. The butter makes sure the rice doesn’t stick.
- Add rice and boil for 5-6 minutes or until the rice is almost 80% done. We do not need to cook the rice completely. The rice should still have a bite to it but almost cooked. Check the salt in rice and add more if needed.
- Drain the rice and let the water drain out completely. Do you see how flaky the rice is?

- Step 3: Dum the biryani: Now comes the part where the action is. Dum is the integral part of biryani and I use my Conventional Oven to slow cook the biryani and infuse the spices and flavors together.
- Preheat the oven to 375 F. Apply some butter/ghee to a large flat tray and pour the vegetable gravy at the bottom.
- Spread the rice on top of the gravy.
- Add a handful of fried onions on the rice and add chopped cilantro too. Add a couple more tablespoons of butter/ghee.
- Soak Saffron in little warm water to get orange color in biryani. Food color can be added to get the orange effect. Add saffron water, Seal it with aluminum foil and bake on the top rack for 30-35 minutes.
- Open it up after its done and mix it gently to mix the gravy through the rice.

On the stove top:
- Use a heavy bottomed pot to make the gravy. Cook till the potatoes are completely done. Turn off the flame and in the same pot, Add the layers of rice, cilantro and fried onion.
- Now put a cast iron griddle or a heavy flat pan on the stove top and turn the heat on to low flame. I use this Cast iron griddle.. its super heavy!
- Put the prepared layered pot on the griddle and cover the pot with a clean cloth/kitchen towel. Put the lid on tightly and Wrap the towel around the lid. Traditionally, dough is used to seal the container. But here I don’t let the steam escape by using a cloth.
- Dum or slow cook like this for 30-35 minutes on very low heat, basically like slow-cooking.

In the Instant pot:
Instant pot works great for those small portions of instant cravings of biryani. I say small portions because I would like to keep the rice intact and don’t mush it while mixing. But still, I love my instant pot version dum biryani too because I don’t have to keep checking if the biryani is burning at the bottom. Here’s how its done:
- Make the gravy in the pot as mentioned above.
- Boil rice separately on stove-top and drain it.
- Layer rice on the gravy and then fried onion, cilantro, butter/ghee and close the Instant pot lid.
- Turn off saute mode and turn on Slow cook mode. Slow cook (or Dum) the biryani for 20-25 minutes and done!

“Good to know” stuff before making a Biryani:
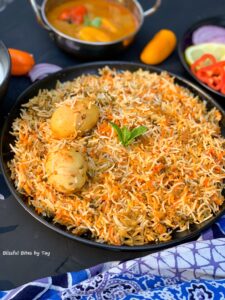
How does a good biryani look like?
Biryani rice has to look separate and should scatter like pearls. Mushy rice in biryani is just not right. The color of the biryani depends on your gravy, your chili powder and basically how you mix the rice. You have to be very very gentle when mixing the biryani, just fluff it and don’t rush with the mixing, even though your family is starving 😁
Basic stuff we need for biryani:
- A good basmati rice, the aroma of basmati rice just sets it apart.
- Fried onions: They are easily available in stores or amazon. If you cannot find fried onion, you can make it yourself. Just dust them with a light coating of corn flour or all-purpose flour and fry them in oil till they are golden brown. We fry them in the Air fryer too sometimes and they turn out just fine.
- A little bit of mint
- lots of cilantro or coriander leaves
- Yogurt
- Whole garam masala spices. If you don’t have a whole lot of spices, we can manage with only cloves, cinnamon and cardamom.
Which method is better? Stove-top/Instant pot or in the Oven?
As I said, Dum biryani is about the process. As long as you can Dum it someway, any method will work. I have tried all the methods and they all provide good results.
Ratio of gravy to rice:
The biryani will work better if the gravy is 1/3 of the cooked rice. That will make each bite as flavorful as the next.
How to serve biryani?
Hyderabadi Biryani is served with Mirchi ka salan and Onion raita with onion and lemon slices on the side. I will be working on mirchi ka salan recipe soon.
Difference between biryani and pulao/pulav:
And last question which I think is the most important of all. Biryani and pulao are almost interchangeable but with a ton of difference in the grain texture. Biryani is cooked in layers in a slow cook process where as pulao is meat/vegetable cooked all together with rice. A rice which is slow-cooked with the juices of the meat/vegetables will taste entirely different than the rice cooked together with the vegetables. Try it once and you will see the difference.
If you looking for more biryani recipes, check these out:


Mirchi ka salan Recipe to accompany Veg Dum Biryani:
A good Hyderabad style dum biryani is always accompanied by Mirchi ka salan. The rich, creamy and tangy gravy goes perfectly well with biryani. Please click the below picture for the Mirchi ka salan recipe.

Lets get to the recipe then:

Veg Dum Biryani
Course: Rice/Grain DishesCuisine: IndianDifficulty: Medium6
servings30
minutes1
hour30
minutes1
hour30
minutesAuthentic and Spicy Hyderabadi style Veg Dum Biryani
Ingredients
- For the gravy:
2 tbsp Ghee
1 tbsp whole cloves
1 tsp Shah Jeera/Black cumin
3-4 cardamom
1 tbsp ginger garlic paste( homemade ginger-garlic paste)
1/4 cup loosely packed mint leaves
1/4 cup cilantro/coriander leaves
1/2 cup plain yogurt
1/2 tsp Turmeric powder
1 tbsp Red chilli powder (adjust as per your taste)
Salt( as per needed, only for the gravy)
1 tbsp coriander powder
1 tsp garam masala powder
Juice of half a lemon
3 potatoes peeled and cubed
2 carrots peeled and diced into small pieces
1 cup frozen peas
1/2 cup frozen beans
- For making the rice:
3 cups Extra long Basmati rice
2-3 cardamom pods
1 bay leaf
2 tbsp butter/oil
Salt
- For the final Dum:
1/4 cup fried onion
1/2 cup chopped cilantro
1 tbsp butter/Ghee
a pinch of saffron threads (optional)
Method
- Soak the saffron in warm water.
- Wash and Soak the basmati rice for 30-60 minutes.
- Making the gravy:
- Chop the vegetables and Add ginger-garlic paste, mint-coriander (either coarsely ground or chopped), yogurt, Salt, lemon juice, Turmeric powder, Red chilli powder, coriander powder, garam masala powder. Let this sit for at least half hour.
- I use my instant pot to cook my vegetables, you can use a pressure cooker or simply a pan and cook till the potatoes are done.
- Turn on saute mode on the Instant pot. When it is hot, add ghee. Add whole garam masala spices to the warm ghee and sauté for a minute till they start to sizzle and beautiful aroma of spices comes out. The spices I added here are cloves, cinnamon, shah jeera, cardamom, star anise.
- Add the marinated veggies, Sauté for a few minutes and close the lid. Pressure cook/Manual mode : 5 Minutes. DO NOT ADD ANY WATER. If you are using a pressure cooker, pressure cook for just one whistle.
- Making the rice:
- Boil a large pot of water, add salt, 2 tbsp butter, cardamom and a bay leaf. There is no measure for water. Just a large pot more than half way filled. The water should be salty like sea water. The butter makes sure the rice doesn’t stick.
- Add rice and boil for 5-6 minutes or until the rice is almost 80% done. We do not need to cook the rice completely. The rice should still have a bite to it but almost cooked. Check the salt in rice and add more if needed.
- Drain the rice and let the water drain out completely.
- Dum/Slow cook in Conventional Oven:
- Preheat the oven to 375 degrees F . Apply some butter/ghee to a large flat tray and pour the vegetable gravy at the bottom of the tray.
- Spread the rice on top of the gravy.
- Add a handful of fried onions on the rice, butter/ghee and add chopped cilantro too.
- Add saffron water, Seal it with aluminum foil and bake on the top rack for 30-35 minutes.
- Open it up after its done and mix it gently to mix the gravy through the rice.
- Dum on the stove-top:
- Use a heavy bottomed pan to make the vegetable gravy. Cook it till the potatoes are completely done. Turn off the flame and in the same pan, Add the layers of rice, cilantro and fried onion.
- Now put a cast iron griddle or a heavy flat pan on the stove top and turn the heat on, use low flame.
- Put the prepared layered pot of biryani on the griddle and cover the pot with a clean cloth/kitchen towel. Put the lid on tightly and Wrap the towel around the lid.
- Dum or slow cook like this for 30-35 minutes on very low heat.
- Dum in Instant pot:
- Make the gravy in the pot as mentioned above.
- Boil rice separately on stove-top and drain it.
- Layer rice on the gravy and then fried onion, cilantro and butter and close the lid
- Turn off saute mode and turn on Slow cook mode. Slow cook (or Dum) the biryani for 20-25 minutes and done!
Notes
- Please go through my post in detail and you can find pictures for each step.
- I have noted down 3 kinds of methods we can “dum” the biryani. One in conventional oven, in instant pot and on the stove-top. Please see the details with pictures above the recipe card.
- Follow the “Good to know” stuff and you will learn a lot of things to make an amazing biryani. Do not skip this.
- Biryani is served with mirchi ka salan and raita. Me and my daughter like to eat it plain with raw onion.

Pin this for later:
[USM_form]
[DISPLAY_ULTIMATE_SOCIAL_ICONS]
Note: As an Amazon Associate I earn from qualifying purchases.